

Quick Start General guidelines
Not sure if your page setup is correct? You can click here to use our proportional scaler/aspect ratio calculator to calculate the correct dimensions of your document.
You can use one of our free templates, or if you should choose to create your poster from scratch, follow the simple guidelines below. For more detailed information and design tips scroll further down on this page.
Creating a poster in "PowerPoint" file is straight forward. Follow these instructions
1. Open the program, and specify "blank presentation".
2. When the auto layout screen appears, choose the "blank" template.
3. From the "Design" menu, go to page setup. Specify the size (in inches) of the entire poster. The maximum that the program will allow is 56 x 56 inches. Since many of your posters will be larger than that, enter a percentage (50% is most convenient) of the final finished size. Be sure to inform us of the final finished size. For example, if your final poster will be 48 x 96 inches, make your page setup 24 x 48 inches. The final size will be doubled when output. Click OK. We can enlarge to any degree, but only in proportion to the "page setup" values.
4. You will see a rectangle that will fill your desktop. This is your "canvas".
5. To insert text, use the text tool to draw a rectangle of the approximate size, and start typing. You can change the proportions, type size and style later. Try to use a minimum of 24 point type if you are using a canvas the size of the finished poster, or 12 point if you are using a 50% reduction. You can import text from your word processor via copy and paste. You may have to change the formatting of the pasted text. It rarely survives the translation process unchanged. If you are using a large header, try to keep it to 3 or 4 lines, a final type size of less than 150 point for the main heading, and less than 100 point for subheadings.
6. Inserting Charts & Graphs: To bring in charts and graphs from Excel, Word or other applications, go to EDIT>COPY to copy your chart, come back to PowerPoint, and go to EDIT>PASTE to paste it on the poster. You can scale the charts or graphs as needed.
Suggestion: Press the SHIFT key as you scale your charts or graphs to scale them proportionally
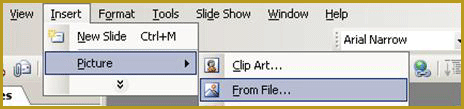
7. Scanned pictures (scan as tiff or jpeg files ONLY, RGB if possible) may be inserted by choosing "insert picture" from the "insert" menu. You may resize the imported picture by clicking/dragging the corner selection bars. Any other image manipulation should be done before importing.
Minimum scan resolution for acceptable viewing at various enlargement sizes.
Size of Original |
6" x 9" |
12" x 18" |
24" x 36" |
35mm slide |
scan at 600 dpi |
scan at 1200 dpi |
scan at 2400 dpi |
2" x 3" |
scan at 300 dpi |
scan at 600 dpi |
scan at 1200 dpi |
4" x 6" |
scan at 150 dpi |
scan at 300 dpi |
scan at 600 dpi |
8" x 10" |
scan at 90 dpi |
scan at 180 dpi |
scan at 360 dpi |
8. Once you have all of your text and pictures located properly, you can change backgrounds, borders, lettering colors and style. To change the entire background, choose "background" from the "format" menu. Individual text box backgrounds can be changed by selecting the box and changing the "fill" colors.
9. Use lettering effects such as outline or shadow sparingly. Be sure they are much lighter or use the transparent feature otherwise it may look like double print when printed at full size. Bold, italic, and underline are OK.
10. The design process is not difficult, but is time consuming and even more so if you are starting from scratch. If you prefer, we can do any or all of it for you.
11. Alternatively, you can start with a PowerPoint template. We provide free templates for your use (click here for free templates). They are useable to design various size posters, and might be a good starting point if you have had little experience with this type of display. Sizes, styles, colors and box shapes can all be changed easily, as can type styles.
Most Common Problems and how to avoid them
- Final printed size not proportional to page set up
- PowerPoint page setting defaults to 10”x7.5” (on-screen show). Double check to change this to the size you need before you invest time creating your poster.
- If your poster needs to be larger than the 56" PowerPoint maximum work at 50% and we will enlarge it for you when we output your poster.
- Imported Graphics at insufficient resolution
Image looks fine on your screen but is pixilated on the poster. It is important to start with the best image you have and avoid low resolution images taken from the Web. For best results, do not copy and paste images. When assembling your poster from other existing images use INSERT>PICTURE>FROM FILE
 .
.
If you scale your images too much (typically more than 200%), image quality will suffer. See the example below:

Avoid unwanted surprises:
Always preview images at the magnification they will appear at on the finished poster. This will reveal any resolution (pixelation) problems.
If the page setup is set at the final printed size, choose: VIEW>ZOOM>100%. If the page setup is set at ½ of the final printed size, choose: VIEW>ZOOM>200%.
- Incorrectly saved files
- When saving as PDF be sure to save at high quality setting (print or press resolution option)
- In PowerPoint, save with embedded fonts (From menu bar choose Tools / Options / Save check box “Embed TrueType Fonts” w/button “embed all fonts best for editing by others”
- Fonts too small
- For effective viewing at six feet never go below 24pt type when creating your poster at 100%
- San serif fonts are easier to read than serif fonts in large sizes (Arial vs. Times Roman for example)
- Dark backgrounds with color type
- It is best to work with dark type on a light background for printed material
- If you must work on a dark background always use light colored type and be especially sure to check anything you may import into your document, black type will disappear into a dark blue background.
- Be sure to check any drop shadow you may use. If the color of the shadow is too close to the color of the lettering, it will appear like double print.
- Use one platform for PPT version to create your poster -- Do not shuffle back and forth between Mac and PC.
Design Suggestions:
Before you begin ask yourself this question: "If the viewer carries away only one idea, what do I want it to be?"
Write down your answer. This is the theme of your poster, the focal point. Everything you choose to include on your poster should support this theme.
Less is More - Try to keep your word count as low as possible to maximize the chance that viewers will actually read your poster.
Use your real estate wisely – demote less important sections (that few people read) to the undesirable real estate at the bottom portion of your poster, freeing up the right-hand column area for your Conclusions
Font Size – All information should be legible from six feet -- do not forget this includes labels on whatever charts and graphs you may incorporate in your poster
Do not proof your own work -This is very important !
The rough draft process - Rough drafts are especially helpful. Remember you have been intimately involved in your project and may assume as obvious information others may not follow. Find volunteers to look at your poster when you are not present--ask them to leave their suggestions on small Post-Its. Ask them to comment on word count, prose style, idea flow, figure clarity, font size, spelling, etc.
Dark Backgrounds are best avoided – Your materials will be most legible when using dark type on a light background. Another advantage is when importing graphics they often have a white bounding box which can be problematic to eliminate.
Do not "bullet" section headers. - Use a larger size Bold version of the same font as the body copy.
Do not use underlines with lower case text - Take care when using underlines. Lower case letters like g,j,p,q,y will have the underline run through them, rendering them more difficult to read
Use boxes with your pictures -- they look better when framed. After inserting images into your poster draw a rectangle around them. Select “no fill”. Set the line to a pleasing thickness of 1-1/2pt or more. Then group the image and rectangle.